VR Maze Challenge: How I Did It
VR Maze Challenge: How I Did It
VR Maze Challenge is meant to provide unique virtual reality maze experience. Each level presents a unique maze with a different challenge. The prototype consists of two levels, Maze 1 and Maze 2.
Maze 1 is designed from the terrain itself. Lighting provides the player a way to navigate the maze, bluer being closer to the exit. Monster NPCs roam the maze and will send the player back to the beginning of Maze 1.
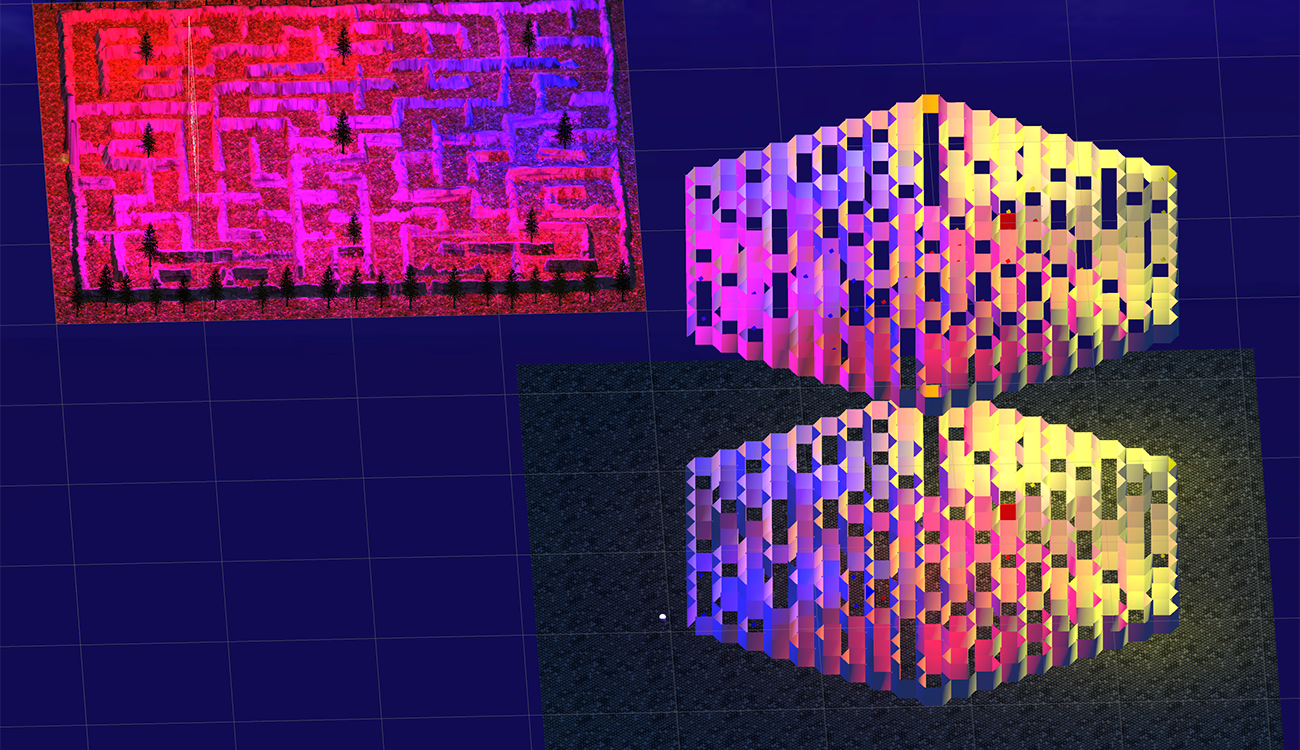
Maze 2 was imported from Rhino 3D providing a more manufactured look and feel. Maze 2 is composed of two parts. The maze the player navigates and the map which is far below the maze. The maze has a transparent floor so the player can look down to navigate the maze. Additionally, the player must pick up collectables to open the door of the corresponding color and advance. There are 3 doors blue, red, and yellow with 10 collectables each. Lastly Maze 2 also has Alien NPCs that will send the player back to the previously opened door.
The Mazes
Maze 1

Terrain
To generate Maze 1 I used a simple online maze generator. This exported the maze into a .png file.

I then imported the png into my Unity project. I wanted the maze to be built from the mountains. To do this I applied the png as a texture to a blank terrain.
 This allowed me to create the mountains by simply following the lines of the maze.
 Texture & Sky
I wanted the mountains to appear rocky with a more grass-like walking path. I downloaded a few free textures from the Unity Store and began to try them out. The first texture that is applied is the base texture and covers the entire terrain so I began with the rock texture.
 Next I applied my walking path texture. I painted the texture in and soon had a mountainous maze. Lastly I applied a sky, called a skybox in Unity. I found some in the Unity Store and tried them out, landing on a nice night sky.

Lights
The last component to the physical maze would be the lights. I used 9 different point lights to shade the maze from red to blue. I aligned one point light then duplicated it 8 times, repositioned them and colored them. Then I increased the intensity a little then increased the rage considerably, bathing the maze in soft, colored light.
Maze 2

Maze Generator & Rhino
To create Maze 2 I used a maze generator from GitHub my professor recommended. I downloaded the Repo and after some experimenting downloaded a maze that was more difficult than the first.
 This exported a .svg file. I imported that into Adobe Illustrator then saved that as a .ai Illustrator file. This file type could be opened in Rhino3D. I extruded the curves and offset them to give the maze walls thickness.
 I saved this file out as a .obj and imported the file into my Unity project.
Mesh Colliders
I scaled and positioned the maze on top of an invisible plane allowing the player to look through the floor to the map maze below. It is important to check convex on the mesh collider of the maze walls or the player could run through them. This simple checkbox was a pain point and took way too long to find.
 Walls & Collectable Items
Next I added in the collectables and corresponding walls. I created three different prefabs for the collectables, blue, red and yellow. Each one was simply a cube set to float above the ground, colored with a shader and scripted to rotate.
using System.Collections;
using System.Collections.Generic;
using UnityEngine;

public class Rotate : MonoBehaviour {

	void Update ()
	{
		transform.Rotate (new Vector3 (15, 30, 45) * Time.deltaTime);
	}
}
Each wall is a cube, transformed to be the same shape as the maze walls and colored with the same shader as it’s corresponding collectable. The script that destroys the walls will be covered later.

 Lights
Similar to Maze 1 I created several point lights to give the maze some color and differentiate each section, blue section, red section and yellow section. The maze’s white walls were easily illuminated but I still increased intensity and rage to bathe the entire maze in light.
Map Layer & Player Location
Next I created the map layer. I simply duplicated everything and moved it straight down so the player could see most of it from above. To create the player location marker I used a sphere illuminated by a spotlight. A simple script would allow the sphere and light to follow the player on the map layer.

using System.Collections;
using System.Collections.Generic;
using UnityEngine;

public class FollowObject : MonoBehaviour {

	public GameObject player;
	//private GameObject g;
	public float yOffset = -100f;
	public float xOffset = 0;
	public float zOffset = 0;

	// Update is called once per frame
	void Start()
	{
		//g = GameObject.Find("Sphere A");
		//Debug.Log(g.name);
	}

	void Update () {

		transform.position = player.transform.position + new Vector3(xOffset,yOffset,zOffset);

	}
}
The Text
The Messages
As with any game, message throughout are needed. I created 11 different messages that do things like introduce the Mazes, tell you if you’re hot or cold, keep score and congratulate you when you finish.

The Canvas
When I created the first text element Unity also created the Canvas. The Canvas is where all UI components live, including all text. It shows where the text will display in the camera view. To display the text in a traditional game the render mode on the canvas needed to be set to Screenspace-Overlay wich uses the view of the main camera. For a VR game, Screenspace-Camera is the correct setting. This will place the canvas in the view of the VR camera.
With all my messages on the canvas it looked like a big jumble.
 I would need to use triggers and scripting to show each message only when a specific event occurs.
The Triggers
The Need
I needed triggers for almost every element of the game; showing messages, playing sounds & music, keeping score and interacting with the NPCs.
Trigger Objects
Each trigger needed a trigger object with a mesh collider that is checked trigger. For showing messages, playing sounds and music I used an empty game object. This created an invisible object that the player can pass through unknowingly but will trigger an event. For keeping score the trigger objects are the collectables and for interacting with the NPCs, I added a capsule collider.
The Code
I am still pretty new at C# but I was able to use examples I found online and after some debugging I had several working scripts.
Activate: This script is attached to an empty game object and is used to activate a specific game object on trigger.
public class Activate : MonoBehaviour {

	public GameObject triggeredObject;

	void Start () {
		triggeredObject.SetActive (false); //Turns object off on start of scene
	}

	void OnTriggerEnter (Collider player) {
			triggeredObject.SetActive (true); //Turns object on when collider is entered
	}
}
Collect & Count: This script is attached to the player and is used to pick up collectables and keep score.
public class CollectCount : MonoBehaviour {

	public Text blueCount; //Set the text object in inspector
	public Text redCount;
	public Text yellowCount;
	public GameObject bluePickUp; //Set the pick up objects in inspector
	public GameObject yellowPickUp;
	public GameObject redPickUp;
	public GameObject blueWall; //Set the walls in inspector
	public GameObject redWall;
	public GameObject yellowWall;
	private int blueInt; //counts the collectables when picked up
	private int redInt;
	private int yellowInt;
	public AudioClip collect; //Set the collect sound in inspector
    public AudioClip destroy; //Set the wall destory sound in inspector
	private AudioSource source; //Uses the AudioSource component in inspector

	void Start ()
	{
		blueInt = 0; //set counts to 0 when game starts
		redInt = 0;
		yellowInt = 0;
		SetBlueCount (); //Initializes count function
		SetRedCount ();
		SetYellowCount ();
		source = GetComponent<AudioSource> (); Calls AudioSource Component int inspector

	}


	void OnTriggerEnter(Collider col)
	{
		Debug.Log (col.gameObject.name);
		if (col.gameObject.tag == "Blue Pick Up") //When game object with tag "Blue Pick Up" is hit by player collider...
		{
			col.gameObject.SetActive (false); //set collectable to inactive
			blueInt = blueInt + 1; //adds 1 to collectable count
			SetBlueCount (); //Calls count function
			source.PlayOneShot (collect); //play collect sound once
		}
			if (col.gameObject.tag == "Red Pick Up")
		{
			col.gameObject.SetActive (false);
			redInt = redInt + 1;
			SetRedCount ();
			source.PlayOneShot (collect);
		}
				if (col.gameObject.tag == "Yellow Pick Up")
		{
			col.gameObject.SetActive (false);
			yellowInt = yellowInt + 1;
			SetYellowCount ();
			source.PlayOneShot (collect);
		}
	}


	void SetBlueCount ()
	{
		blueCount.text = "Blue Count: " + blueInt.ToString (); //counts collectables and converts to string to be displayed
		if (blueInt >= 10) //If count is greater than or equal to 10...
		{
			blueWall.SetActive(false); //set wall in inactive
            source.PlayOneShot(destroy); //play destroy sound once
		}
	}
	void SetRedCount ()
	{
		redCount.text = "Red Count: " + redInt.ToString ();
		if (redInt >= 10)
		{
			redWall.SetActive(false);
            source.PlayOneShot(destroy);
        }
	}
	void SetYellowCount ()
	{
		yellowCount.text = "Yellow Count: " + yellowInt.ToString ();
		if (yellowInt >= 10)
		{
			yellowWall.SetActive(false);
            source.PlayOneShot(destroy);
        }
	}
}
Play Sound, Start Music, Stop Music: These scrips game me some trouble and in the future I hope to combine them. They are attached to any trigger object that is used to play a sound, start or stop music. Play Sound:
public class playSound : MonoBehaviour {

	public AudioClip sound; //Set sound in inspector
	private AudioSource source; //uses audioSource component

	void Start () {
		source = GetComponent<AudioSource> (); //sets source variable to use AudioSource conmpnent in inspector
	}

	void OnTriggerEnter (Collider player)
	{
		if (player.gameObject.tag == "Player") { //if player object tagged "Player" hits object collider...
			source.PlayOneShot (sound); //play sound once
		}
	}
}
Play Music:
public class playMusic: MonoBehaviour {

	private AudioSource m_MyAudioSource; //Uses audio Source in inspector

	void Start()
	{
		m_MyAudioSource = GetComponent<AudioSource>();
	}

	void OnTriggerEnter(Collider other) //when collider is triggered...
	{
			m_MyAudioSource.Play(); //play audio set in AudioSource component in inspector
	}
}
Stop Music:
public class stopMusic: MonoBehaviour {

	private AudioSource m_MyAudioSource; //Uses audio Source in inspector

	void Start()
	{
		m_MyAudioSource = GetComponent<AudioSource>();
	}

	void OnTriggerEnter(Collider other) //when collider is triggered...
	{
		if (other.gameObject.tag == "Player")
		{
			m_MyAudioSource.Stop(); //stop audio set in AudioSource component in inspector
		}

	}
}
Show Score: This script is attached to an empty game object and is used to show the score text only when triggered.
public class ShowScore : MonoBehaviour
{

	public GameObject uiObject1; //set text objects in inspector
	public GameObject uiObject2;
	public GameObject uiObject3;

	void Start ()
	{
		uiObject1.SetActive (false); //on start deactivate text
		uiObject2.SetActive (false);
		uiObject3.SetActive (false);
	}
	// Update is called once per frame
	void OnTriggerEnter (Collider player)
	{
		if (player.gameObject.tag == "Player") { //when object tagged player enters object collider...
			uiObject1.SetActive (true); //show text objects
			uiObject2.SetActive (true);
			uiObject3.SetActive (true);
		}
	}
}
Show UI: This script is attached to an empty game object and is used to only show text when triggered, it then destroys the empty game object so it cannot be triggered again.
public class ShowUI : MonoBehaviour {

	public GameObject uiObject; //text to be triggered. Set in inspector
	void Start()
	{
		uiObject.SetActive(false); //disable text on start
	}

	void OnTriggerEnter (Collider player)
	{
		if (player.gameObject.tag == "Player") //when object tagged "Player" enters object collider...
		{
			uiObject.SetActive(true); //Show text
			StartCoroutine("WaitForSec"); //starts "WaitForSec" routine
		}
	}
	IEnumerator WaitForSec()
	{
		yield return new WaitForSeconds(5); //wait for 5 seconds
		Destroy(uiObject); //destroy text object
		Destroy(gameObject); //destory trigger object
	}
}
The NPCs
For each maze I wanted a different NPC. Monsters seemed ideal for the first maze and aliens seemed to work well for the second. I found both in the store.

 The Needs
I needed all my NPC’s to patrol the maze they are on and if they catch the player, send them back to a specific location.
The Code
Most of the code was included in the prefabs that downloaded from the store but I still needed a couple scripts.
NPC Patrol: This script is attached to the NPCs and allows then to patrol a series of points that is set in the inspector.
public class npcPatrol : MonoBehaviour {

	public Transform[] points;
	private int destPoint = 0;
	private NavMeshAgent agent;


	void Start () {
		agent = GetComponent<NavMeshAgent>();

		// Disabling auto-braking allows for continuous movement
		// between points (ie, the agent doesn't slow down as it
		// approaches a destination point).
		agent.autoBraking = false;

		GotoNextPoint();
	}


	void GotoNextPoint() {
		// Returns if no points have been set up
		if (points.Length == 0)
			return;

		// Set the agent to go to the currently selected destination.
		agent.destination = points[destPoint].position;

		// Choose the next point in the array as the destination,
		// cycling to the start if necessary.
		destPoint = (destPoint + 1) % points.Length;
	}


	void Update () {
		// Choose the next destination point when the agent gets
		// close to the current one.
		if (!agent.pathPending && agent.remainingDistance < 0.5f)
			GotoNextPoint();
	}
}
Caught: This script is also attached to the NPCs and uses a trigger command to send the player to a certain position when caught.
public class Caught : MonoBehaviour {

	public GameObject player; //player object
	public float x; //x position value
	public float y; //y position value
	public float z; //z position value
	public AudioClip caught; //caught sound
	private AudioSource source; //audio source

	void Start () {
		source = GetComponent<AudioSource> (); //Calls the audio source component in the inspector
	}

	void OnTriggerEnter (Collider player) {
		if (player.gameObject.tag == "Player")
		{
			player.transform.position = new Vector3(x, y, z); //Changes player position when player enters collider of NPC. Set position in Inspector
			print(transform.position.x); //shows transformed position in console
			source.PlayOneShot (caught); //Plays sound once when caught
		}
	}
}
Conclusion
with all elements in place I have a working maze game.
 Next I would like to add additional maze levels and figure out how to build onto a playable platform.