Totally Fab: Rick & Morty Art
Totally Fab: Rick & Morty Art
My Inspiration
If you have never seen Rick & Morty and you like adult, animated comedies I highly recommend this show for you. In a nutshell, it is the adventures of Morty, a 14 year old boy who is not the brightest bulb, and Rick, his super genius grandfather. Through their adventures they deal with some fairly existential issues. In Season 1, Episode 8 “Rixty Minutes” Morty’s sister, Summer, has something of an existential crisis and what Morty says to her has always resonated with me.
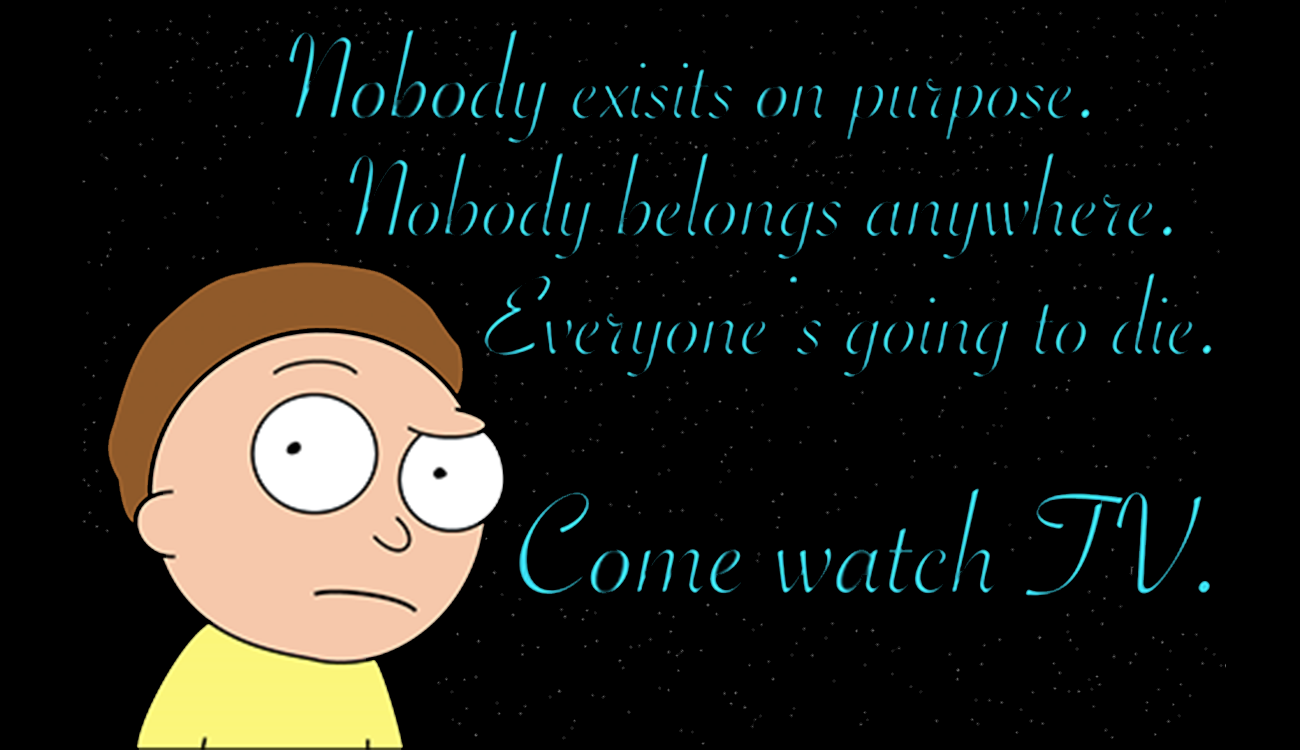
Nobody exists on purpose.
Nobody belongs anywhere.
Everyone is going to die.
Come watch TV.
This quote has resonated with me. It reminds me to not sweat the things I cannot control or will never know. It keeps me grounded in what I can control and helps to keep me sane when things seem overwhelming.
I have wanted to create some art out of it for a while but it is not until this class that I had the knowledge or skills to make it reality.
The Process
I wanted to create an 17x11 wood piece. The quote and Morty engraved against a black night sky with stars. Until now, I had not idea how to engrave and painting was the only way I knew to get the background.
Now, however, I have access to a laser cutter and a vinyl cutter. With these two tools and a bit of paint, I was able to bring it to life.
Step 1: Design
Before any cutting laser or otherwise can take place I needed to complete my design. I found a great pic of Morty to trace…

Used File>Place to place the image into Illustrator, positioned correctly, locked that layer and created a new layer for tracing. A little time with the pen tool and some shapes and boom…

Now to color him. I used another image of Morty to create some new color swatches then used the live paint tool to turn my traced Morty into a live paint group. A few seconds later I had a nicely colored Morty.

Next I created the text. It took a while before I landed on a font and color. I had no idea what would look good so it was a series of guess & check. Eventually I landed on Savoye LET Plain:1.0, a nice curvy font. I found a nice green that matched the Rick & Morty title green and…

Next step was to create the stars. Each star had to be a small circle that the vinyl cutter could cut out. I needed them to be random and everywhere. To do this I created a new scatter brush and set the settings to random. I created a black rectangle and started to brush. The result was perfect.

The large blank spot is where Morty will be. But it all together and the final design looked pretty good.

Vinyl Cutting
This was the simplest part of the project. I needed to cut out each star, the text and Morty himself. We have the Roland GS-24 so I used the Illustrator plugin Roland Cut Studio so send the lines over to the Vinyl Cutter.

The entire process did not take long and when it was done I had to slowly and meticulously remove each star out of the design with a razor blade. Eventually, I had all the cuts removed and was all done with this portion.
Vinyl Cut: Round 1 from Jim Murphy on Vimeo.
Laser Cutting
The next step was to start the laser cutting. This was the coolest, and surprisingly the easiest, part of the project. I went to BLDG61 at the Boulder Public Library. The staff there is incredibly helpful and knowledgable and they were an invaluable help to me in this project.
The laser cutter uses Illustrator strokes to know where to cut. A stroke of .082 will cut all the way through. Any other stroke will engrave. The file sent to the laser cutter needs to be just strokes as any fill could be misinterpreted as a bunch of little strokes. Here is the file I gave to the printer. The strokes for the text was set to 1 and Morty was set to 5. The person at BLDG61 suggested I make the artboard a little bigger then create a rectangle around the border to cut out the perfect 17X11 size. That stroke was set to the .082 to cut all the way through.

The following process was super fun to watch and the final output was perfect. BLDG61 had a wonderful piece of birch for me to use for a paltry $2.50. We loaded it into the cutter and pushed go.
Laser Cutting Rick & Morty Art from Jim Murphy on Vimeo.
Painting
I have never been super artsy but with a little help from friends and the internet I was ready to dive into the world of paint. I bought only the basics, acrylic paint in black, white, red, blue and yellow, some brushes and a pallet.
It took a lot of practice and googling to get the right colors for Morty and the text and overall, it came out a shade or two darker than I and intended but all in all, not bad for my first foray into painting.

Next I needed to paint the background the different primary colors & white for the stars.
I drew a grid in light pencil on the wood and began to fill in each small square with red, blue, white, or yellow. It took a while but eventually, I had it all ready to apply the vinyl.

Applying the Vinyl
This…did not go super well. In my frustration, I forgot to take pictures but the letters were so delicate that they tore and warped in the process of applying them to the wood.
On the bright side, the starts looked great. And I believe I have a simple solution to this problem. Instead of cutting out the letters individually, I will just create a cutout around all the text and then paint the rest in with black. Here is the new file I will use with Roland Cut Studio.

*Update 11/12/17**
The new vinyl cut worked great but did require quite a bit of painting.
After some advice from a friend, I also decided to repaint the letters white. It took a while to repaint the letters and paint all the black aroudn those letters.

But in the end, it turned out pretty well!

I already have a couple people asking me for something similar so I’m very excited for that.