EeonTex Pressure Fabric and Servo Motor
EeonTex Pressure Fabric and Servo Motor
Learning how to use the EeonTex Pressure Fabric was a significant challenge for me. I am relatively new to the world of electronics and this fabric is a very new piece of technology so there is very little documentation or tutorials online. I was able to use a variety of documentation for standard pressure sensors to cobble together a working circuit and code.
My ultimate goal would be to use the fabric to control the behavior of a servo motor. The purpose is to find the best way to create behavior for my Smart Cat Toy.
Lighting an LED
As I mentioned, this was a big struggle for me. The fabric is not like any other sensor and there was not a lot of examples using the fabric online.
My first success came when I was able to simply light up an LED by simply completing the circuit with the fabric. The harder I pressed the brighter the LED.
LightingOneLED from Jim Murphy on Vimeo.
Watching this work I realized that the fabric just acts as a resistor. The harder I squeeze, the less resistance and the more current.
I was still stumped on the next step. How do I go from a simple circuit that requires no code to controlling the behavior of a servo motor with different pressures.
AnalogReadSerial
I consulted my professor and he suggested that I try to dial in the different values in the Serial Monitor so that I would know what values to use when programming for the motor. He recommended I just use the AnalogReadSerial sketch that comes in the Examples in the Arduino IDE.

Using this I should be able to see the analog values, 0-1023, that corresponds to the pressure applied to the fabric.
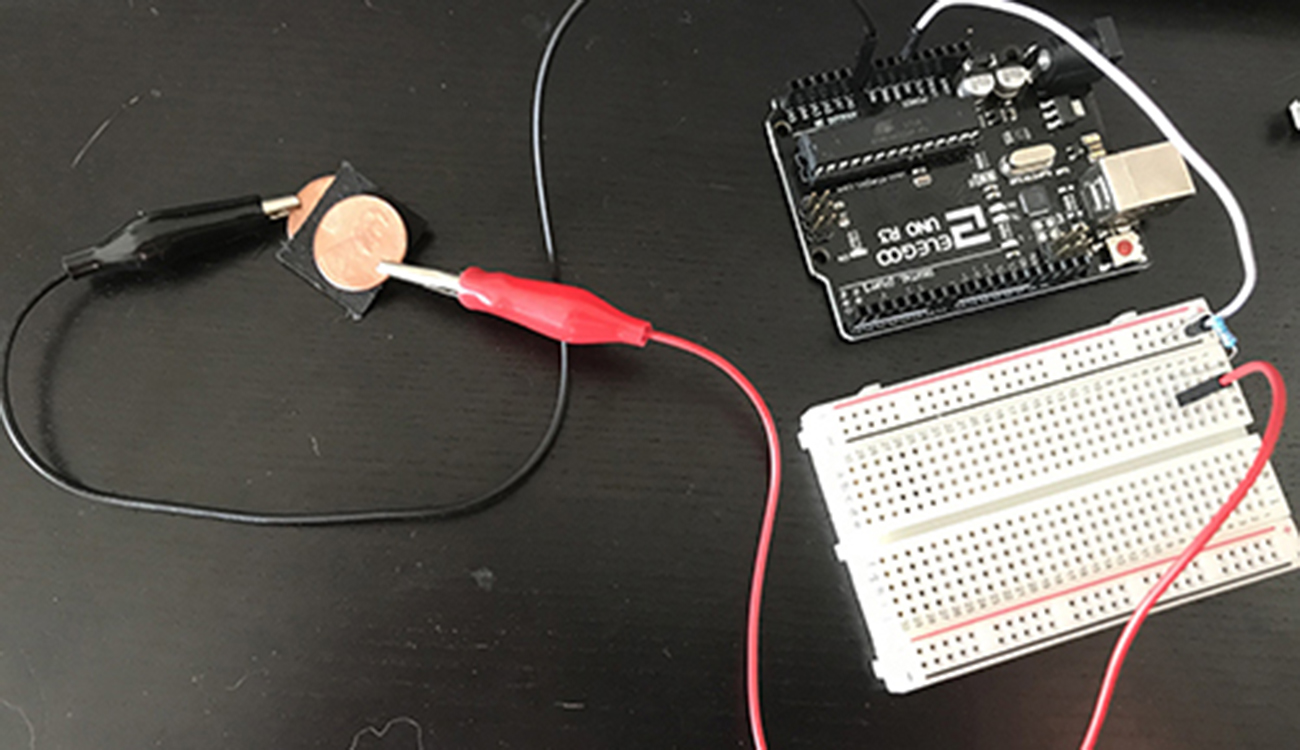
Here is the circuit I set up for this:

I wasn’t sure how to interpret the readings as they seemed to be up and down. At first I tried just full contact or no contact, trying to see which was 1023 and which was 0.
Then I tried putting the fabric between the two pennies to see what pressure correlated to which analog value on the serial monitor. The results were difficult to dial in.
Analog Serial Read EeonTex Fabric from Jim Murphy on Vimeo.
Success…sort of. It is clear when there is full contact (1023) and no contact (0). Then I placed the fabric between the pennies to test the different pressures and different values. The fabric is very sensitive and with just my fingers and a couple pennies I could not be delicate enough to get distinct readings but good enough to move on.
Lighting Two LEDs
While the readings from the serial monitor were a bit erratic, I was able to discern two distinct readings; greater than 1000 and less than 1000. The new problem was the code.
As there was no code written specifically for the fabric, I had to start with code that was written for a more standard pressure sensor like this.
After a lot of googling I found a piece of code that got me started.
They have been an amazing resource for me in this project. In this instance I found an instrucable labeled LED Pressure Game Arduino. Not only did it have step by step instructions for the circuit with a nice diagram with the code ready to copy and paste but it broke down the code piece by piece explaining what it did. This allowed me to modify their code to suit my needs.
I examined their code:
const int yellow1 = 10;
const int yellow2 = 9;
const int green1 = 6;
const int green2 = 5;
const int blue = 3;
const int FSR = 0; // FSR connected to analog pin 0
int level = 0; // variable for the level of force applied to the FSR
void setup() // run once to setup
{
pinMode (red, OUTPUT); // LED set as output
pinMode (yellow1, OUTPUT);
pinMode (yellow2, OUTPUT);
pinMode (green1, OUTPUT);
pinMode (green2, OUTPUT);
pinMode (blue, OUTPUT);
}
void loop() // repeated routine
{
int level = analogRead(FSR);
//next, light up the LEDS according to pressure
if (level <200) {
analogWrite (red, level);
}
if (level >200) {
analogWrite (yellow1, level);
}
if (level >400) {
analogWrite (yellow2, level);
}
if (level >600 ) {
analogWrite (green1, level);
}
if (level >700) {
analogWrite (green2, level);
}
if (level >800) {
analogWrite (blue, level);
}
//Next tell it to turn off all lights if level = 0
if(level == 0) {
digitalWrite (red, LOW);
digitalWrite (yellow1, LOW);
digitalWrite (yellow2 ,LOW);
digitalWrite (green1, LOW);
digitalWrite (green2, LOW);
digitalWrite (blue, LOW);
}
//tell it to flash LEDS if pressure is greater than 800
if (level > 800) {
digitalWrite (red, HIGH);
digitalWrite (yellow1, HIGH);
digitalWrite (yellow2 ,HIGH);
digitalWrite (green1, HIGH);
digitalWrite (green2, HIGH);
digitalWrite (blue, HIGH);
delay(100);
digitalWrite (red, LOW);
digitalWrite (yellow1, LOW);
digitalWrite (yellow2 ,LOW);
digitalWrite (green1, LOW);
digitalWrite (green2, LOW);
digitalWrite (blue, LOW);
delay(100);
}
}
It was just a matter of whittling it down to just what I needed and modifying some of the variables. When I was done, my code ended up looking like this;
const int green = 13;
const int white = 12;
const int Fabric = 0;
int level = 0;

void setup() {
  // put your setup code here, to run once:
  pinMode (green, OUTPUT);
  pinMode (white, OUTPUT);
  Serial.begin(9600);

}

void loop() {
  // put your main code here, to run repeatedly:
  int level = analogRead(Fabric);
  Serial.println(level);
  delay(1000);

if (level >1000)
  {
    analogWrite (green, level);
    digitalWrite (white, LOW);
  }
if (level <1000)
  {
    analogWrite (white, level);
    digitalWrite (green, LOW);
  }

  if(level == 0)
  {
    digitalWrite (green, LOW);
    digitalWrite (white, LOW);
  }


}
This did the trick.
Green & White LEDs by Pressure from Jim Murphy on Vimeo.
Now I was ready to start experimenting with the servo motor.
Using the Servo Motor
So, based on my code above and the information and code I found on Arduino’s site, and another great Instructables page respectively, I cobbled together this:
#include <Servo.h>;
int servoPin = 12;
Servo Servo1;
const int Fabric = 0;
int level = 0;

void setup() {
  // put your setup code here, to run once:
  Servo1.attach(servoPin);
  Serial.begin(2000000);

}

void loop() {
  // put your main code here, to run repeatedly:
  int level = analogRead(Fabric);
  Serial.println(level);
  delay(1000);

if (level >1000)
  {
    Servo1.write(90);
  }
if (level <1000)
  {
    Servo1.write(180);
  }

  if(level == 0)
  {
    Servo1.write(0);
  }


}
So I hooked up the motor to my existing pressure circuit but realized I did not need the bread board so to reduce noise, everything went directly into the Uno.

plugged everything into the computer and held my breath.
Servo Motor with EeonTex Fabric from Jim Murphy on Vimeo.
So…I think it seems to be working? As of now I do not know why the serial monitor seems to stop working after a few cycles.
One suggestion I found online recommended increasing the baud rate, which is why mine is set to two million rather than the standard 9600. This helped get a few more cycles but it stills stopped working.
Another suggested the power required by the servo was overloading the board. I tried loading the program to the board and running it off a 9V battery but it did not yield different results.
Next Steps
So for now I’m pretty stumped. I don’t know why the serial monitor stops, nor am I certain how to get more than two levels of pressure and how to make them stable enough with the fabric. However, I do have some places to start for each problem.
Serial Monitor
- Better Equipment: While unlikely, it is possible that I have a faulty servo motor. To rectify this problem, I purchased a new one to ensure proper functionality.
- Ask My Prof: When all else fails…
- Maybe something wrong with my code?
Stable & More Pressure Levels
- Create my own button out of the fabric.
- Once again, an amazing Instructable Page.
- Try this with a different kind of pressure sensor.
- This one.
</br>
I will continue to update this post as I explore each option and any new options.